🦟 Chapter 4.1: MQTT Integration & Payload Processing
MQTT (Message Queuing Telemetry Transport) is a lightweight, publish-subscribe messaging protocol designed specifically for low-bandwidth, high-latency, or unreliable networks. It serves as the primary machine-to-machine (M2M) communication layer within the MOSSS infrastructure, bridging long-range LoRaWAN telemetry networks directly with the Home Assistant automation engine.
📡 Architecture & Telemetry Pipeline
Rather than maintaining direct HTTP connections from distributed hardware, our system relies on a local Mosquitto MQTT broker to route telemetry asynchronously:
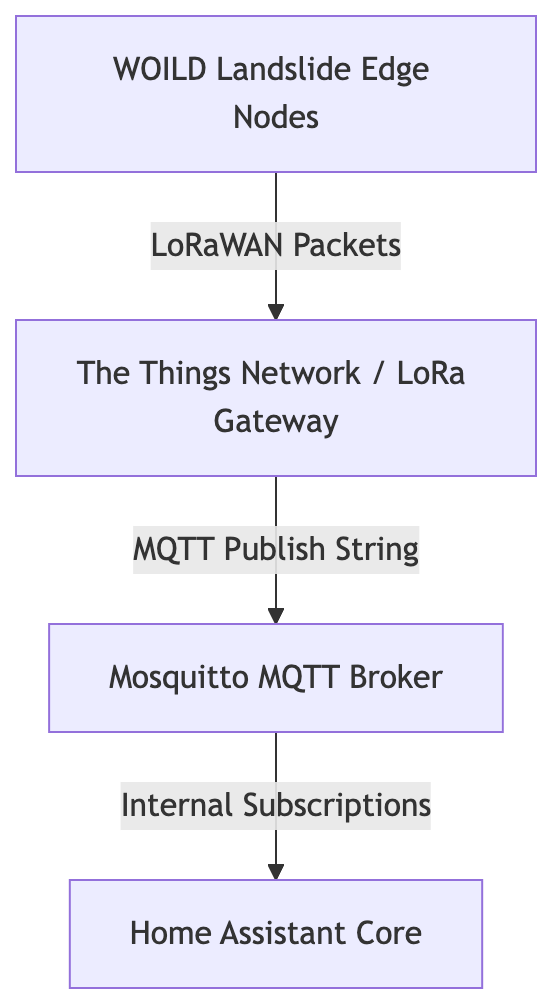
- LoRaWAN & The Things Network (TTN) Bridging: Physical WOILD landslide edge nodes transmit telemetry packets via LoRaWAN to a local gateway/TTN. TTN then funnels these JSON payloads directly to our local Mosquitto broker using dedicated
databrokerM2M credentials to update tracking matrices instantly. - Microcontroller Telemetry: Standalone ESP32/ESP8266 boards or specialized field sensor kits publish readings directly to specific MQTT topics without requiring complex REST API handshakes.
- Decoupled Architecture: Home Assistant subscribes to topics (e.g.,
mosss/field/node01/telemetry) to update internal sensor entities in real time without polling delays.
⚙️ Step-by-Step Mosquitto Broker Setup
Setting up MQTT involves running the local broker container and linking it to Home Assistant.
Step 1: Install Mosquitto Broker Add-on
- In Home Assistant, navigate to Settings → Add-ons → Add-on Store.
- Search for Mosquitto broker.
- Click Install.
- In the Info tab, toggle Start on boot and Watchdog ON.
- Click START to initialize the container.
Step 2: Create an MQTT System User
For security, MQTT clients must authenticate before publishing data to the broker:
- Go to Settings → People → Users. (Note: If “Users” is hidden, enable Advanced Mode under your User Profile).
- Click Add User in the bottom right.
- Enter a username (e.g.,
mqtt-userordatabroker) and a secure password. - Click Create.
Step 3: Configure the Native Integration
- Go to Settings → Devices & Services.
- Click Add Integration and search for MQTT.
- Confirm the configuration—Home Assistant will automatically detect the local Mosquitto add-on and prompt you to enable it using the credentials created above.
🛠️ Defining MQTT Sensors in YAML
Once the broker is operational, define incoming telemetry endpoints in configuration.yaml or an included mqtt.yaml file:
mqtt:
  sensor:
    - name: "Field Node 01 Battery Voltage"
      state_topic: "mosss/field/node01/telemetry"
      value_template: "{{ value_json.battery_v }}"
      unit_of_measurement: "V"
      device_class: "voltage"

    - name: "Field Node 01 Tilt X-Axis"
      state_topic: "mosss/field/node01/telemetry"
      value_template: "{{ value_json.tilt_x }}"
      unit_of_measurement: "°"
🖥️ GUI Alternatives to YAML Configuration
If you prefer not to edit configuration.yaml directly, Home Assistant offers two graphical UI options to set up MQTT sensors.
Method 1: The Native MQTT ‘Add Device’ UI Subentry
Home Assistant allows you to add custom MQTT entities directly from the MQTT integration page without touching configuration files.
- Go to Settings → Devices & Services.
- Click on the MQTT integration card.
- Click Add Entry (or Add MQTT Device depending on your Home Assistant version).
- Fill out the device fields:
- Device Name: e.g.,
Field Node 01 - State Topic:
mosss/field/node01/telemetry - Value Template:
{{ value_json.battery_v }} - Unit of Measurement:
V - Device Class:
voltage
- Device Name: e.g.,
- Click Submit. Home Assistant will generate the entity automatically.
Method 2: MQTT Auto-Discovery (Zero-Configuration GUI)
Instead of manually defining sensors in Home Assistant, your field devices or script can publish a single JSON “discovery payload” to the broker when booting up. Home Assistant automatically picks this up and generates the GUI entities with zero user interaction.
How it works:
The device publishes a JSON configuration string to the prefix homeassistant/sensor/[device_id]/config.
Example Discovery Payload:
- Topic:
homeassistant/sensor/field_node_01_batt/config - Payload:
{
  "name": "Field Node 01 Battery Voltage",
  "state_topic": "mosss/field/node01/telemetry",
  "value_template": "{{ value_json.battery_v }}",
  "unit_of_measurement": "V",
  "device_class": "voltage",
  "unique_id": "field_node_01_battery"
}
Once published, the entity sensor.field_node_01_battery_voltage instantly appears under Settings → Devices & Services → MQTT.
💡 Comparison: YAML vs. GUI Methods
| Feature | configuration.yaml | Native MQTT UI Subentry | MQTT Auto-Discovery |
|---|---|---|---|
| Ease of Setup | Moderate (Requires file editor) | High (Form-based) | Highest (Fully automated) |
| Version Control | Easy (Git/backup friendly) | Stored in internal HA database | Stored in internal HA database |
| Best For | Static home networks | Quick manual additions | Scalable multi-node field deployments |
⚠️ Crucial MQTT Concepts for Beginners
The “Retain Flag” Trap
- What it is: When an MQTT client publishes a payload with the
retain: trueflag, the broker stores that message permanently. Any new subscriber (or Home Assistant upon reboot) immediately receives that old message. - The Pitfall: Setting
retain: trueon rapid sensor telemetry can cause “ghost entities” or outdated data to re-populate long after a sensor has been taken offline. - Best Practice: Only set
retain: truefor state-change configurations or static switch states. Keepretain: false(default) for continuous sensor streams like battery voltage or tilt data.
👉 Proceed to Chapter 4.2: ESPHome