🏠 Chapter 2: Home Assistant Setup
Configure the Home Assistant Gateway
This chapter covers the initial physical provisioning and bare-metal OS installation for the central Modular and Open-Source Science Station (MOSSS) edge gateway. As such, it walks through:
- Installation of Home Assistant OS (HAOS) on a Raspberry Pi 4 or 5.
- Establishing two-tiered login access.
- Creating a dedicated Machine-to-Machine (M2M) profile called
Data Broker(login:databroker) under Settings > People to handle incoming data streams securely.
⚠️ CRITICAL ORDERING: Adhere strictly to the sequence below. Misordering these setup steps will result in a failed headless boot or network mismatch.
🏠 Stage 1: Home Assistant OS Bare-Metal Installation
📋 Prerequisites & Hardware Checklist
Before beginning, ensure your central hub hardware components match our verified specifications:
- Single Board Computer: Raspberry Pi 4 or Raspberry Pi 5 (Minimum 4GB RAM recommended).
- Power Supply: Official Raspberry Pi USB-C power supply (15W for Pi 4, 27W for Pi 5) to prevent undervoltage failures.
- Storage: A 32GB high-endurance microSD card (UHS Speed Class 3 / V30 or better rated for continuous write cycles) or an external USB 3.0 SSD.
- Network: An Ethernet cable connected directly to your local network switch/router for initial provisioning.
💿 Installation Step-by-Step
Because the gateway needs to compute vector matrices locally without internet dependence, we utilize the bare-metal Home Assistant Operating System (HAOS).
-
1. Download the Flashing Tool
Requires Mac, Windows, or Linux PC
Download and install the official Raspberry Pi Imager from raspberrypi.com/software. Insert your storage media into your flashing computer. -
2. Select the HAOS Image
Do not use default Pi OS
- Launch the Imager tool. (note: formatting may be required to continue)
- Click Choose Device and select your model (e.g., Raspberry Pi 4).
- Click Choose OS, scroll down to select Other specific-purpose OS, click Home Automation, click Home Assistant, select Home Assistant OS.
-
3. Flash without OS Customization
Crucial Step
Select your target storage device and click Next.
⚠️ CRITICAL: If the imager prompts you to apply OS customization settings (like setting up Wi-Fi or SSH), select NO. HAOS manages its own network initialization—applying custom configurations through the imager will corrupt the system container structure. Confirm and write the image.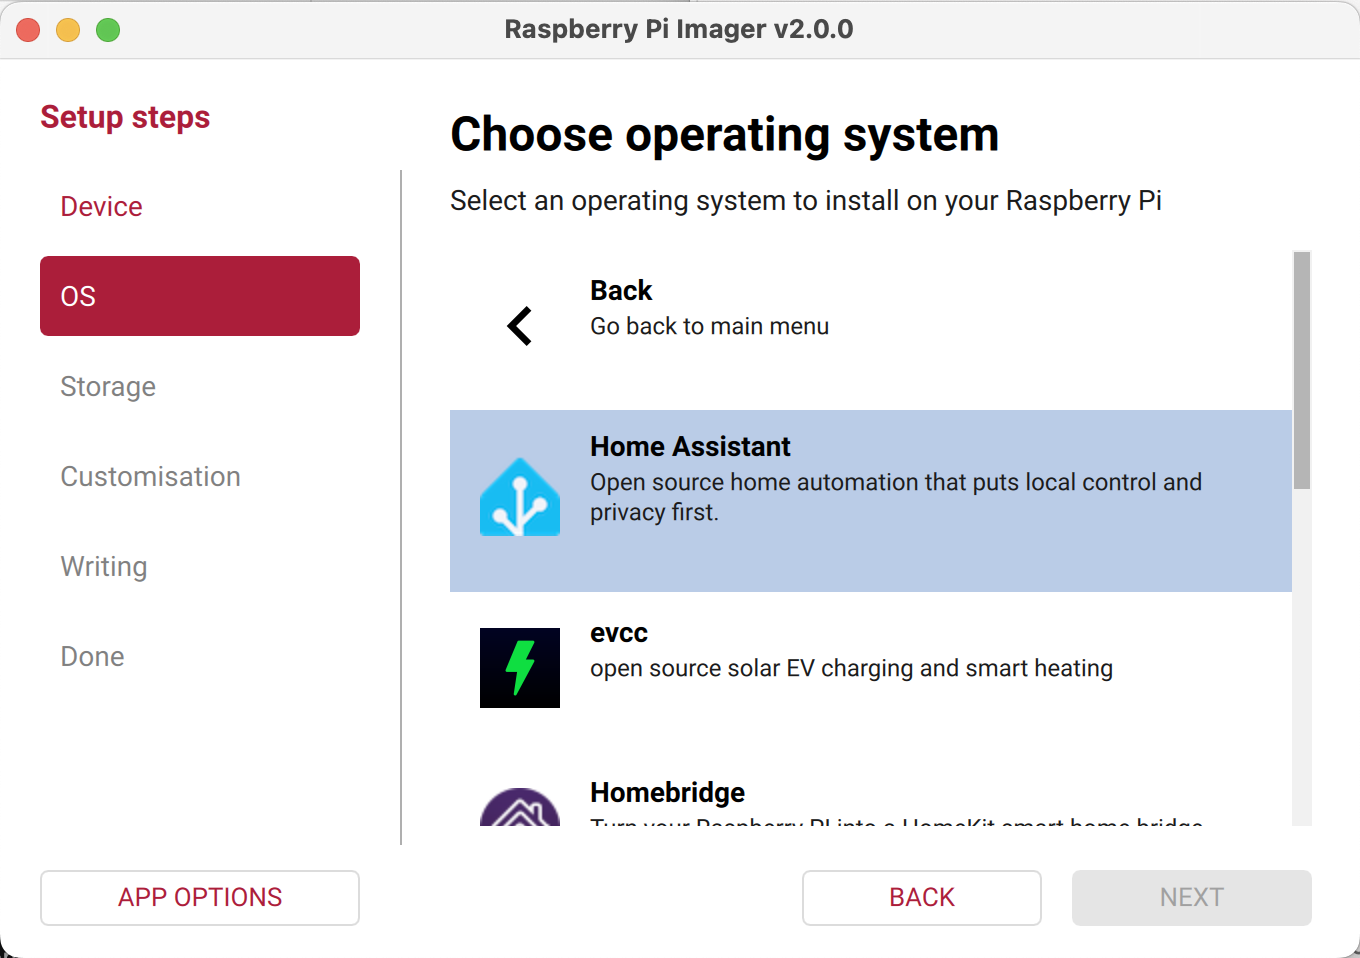
-
4. Headless Initial Boot
Takes 5-15 minutes
Insert the flashed storage into your Raspberry Pi. Connect an Ethernet cable to your router, then plug in the power supply. The Pi will boot headlessly; give it up to 15 minutes to automatically provision, unpack the environment, and fetch system dependencies. -
5. Complete Onboarding UI
Web Browser Setup
On a computer connected to the same local network, open a browser window and navigate to:http://homeassistant.local:8123*(If the hostname fails to resolve, check your router's DHCP client list to find the Pi's IP address and navigate tohttp://YOUR_PI_IP:8123).* Follow the prompts to create your local admin account.
🔐 Stage 2: Operational Security (OpSec) & Network Provisioning
Once you have landed on your fresh Home Assistant dashboard and created your main owner account, advance to user provisioning and system networking:
This section defines the access permissions, secure data pipelines, and remote connectivity meshes required to protect the MOSSS gateway hub from corruption while allowing open scientific collaboration.
🛡️ Multi-Tiered User Access Tiers
Configure these explicit profiles under Settings > People on your newly installed dashboard:
1. Research Partner Profiles (Admin)
- Access Level: Administrative configuration rights.
- Deployment: System owner and shared strictly with active field engineers and collaborative research institution partners to tweak template filters or debug physical sensor links.
2. Public Observation Profile (User / Non-Admin)
- Access Level: Read-Only view rights (Dashboard visualization access only).
- Deployment: Provided to local community leaders, public donors, or visiting scientists. Completely blocks out system configuration menus, preventing accidental damage.
3. Machine-to-Machine (M2M) Data Pipeline (databroker)
- Access Level: Non-admin, Data Authentication Account (Bypasses human UI interaction entirely).
- Deployment Name:
databroker - Crucial Setup: This profile handles incoming data streams from both your local network and remote field assets. Whether your nodes are feeding data locally via the Mosquitto Broker or connecting from remote field sectors using ESPHome Tailscale configurations, they use the
databrokercredentials to securely authenticate their data payloads.
⚠️ SECURITY COMPLIANCE WARNING: Never reuse the credentials for
databrokeron human user profiles. Isolating your automated data pipeline ensures that even if an external field node is physically tampered with, your core gateway administration remains entirely secure.
👉 Proceed to Chapter 3.1: Home Assistant Integrations