🛰️ Chapter 4.3: TTN & LoRaWAN Integration
LoRaWAN (Long Range Wide Area Network) is a low-power, long-range wireless protocol engineered for battery-operated field devices transmitting small payloads over long distances. In the MOSSS architecture, LoRaWAN acts as our primary telemetry link for off-grid, long-range landslide monitoring sensors (such as WOILD edge nodes) deployed beyond the reach of local Wi-Fi or cellular connections.
The Things Network (TTN) serves as our decentralized network server layer, ingesting raw LoRa gateway RF packets, managing device encryption keys, decoding payloads, and forwarding structured JSON data directly to our local Mosquitto MQTT broker or Home Assistant instance.
📡 LoRa vs. LoRaWAN Fundamentals
To understand how telemetry travels from the field to our server, it is helpful to distinguish between the physical radio technology and the network protocol:
| Concept | OSI Layer | Function |
|---|---|---|
| LoRa (Long Range) | Layer 1 (Physical) | Proprietary radio frequency modulation using Chirp Spread Spectrum (CSS). Operates on unlicensed sub-GHz ISM bands (915 MHz US / 868 MHz EU). |
| LoRaWAN | Layer 2/3 (MAC & Network) | Open standard network protocol managing device security, channel selection, gateway routing, and server uplinks. |
Device Classes & Power Management
LoRaWAN end-devices operate under three distinct behavioral classes depending on power availability:
- Class A (Battery / Solar - Default): Devices sleep continuously and wake up only to transmit an uplink. Receiver rx-windows open briefly right after transmitting. Lowest power consumption; ideal for WOILD field nodes.
- Class B (Scheduled Beaconing): Devices open periodic receiver windows synchronized with the gateway for downlinks.
- Class C (Continuous Listening): Device radio receiver remains constantly awake. Highest power consumption; requires main power (e.g., Gateways).
📐 Architecture & Data Pipeline
Field telemetry traverses a multi-stage pipeline from physical sensor actuation to Home Assistant dashboard display:
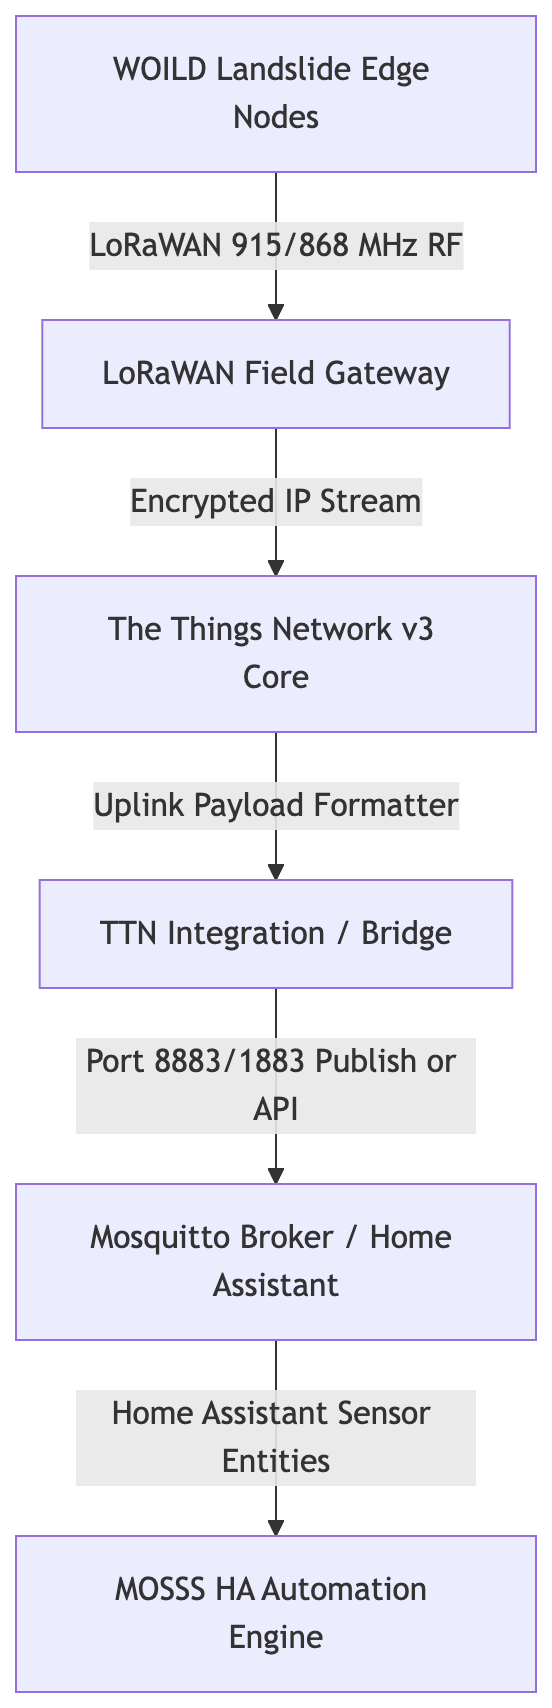
- Edge Nodes (WOILD): Battery/solar-powered microcontrollers equipped with tilt sensors, soil moisture probes, and battery monitors transmitting at sub-GHz frequencies (e.g., US915 / EU868).
- LoRaWAN Gateway: Ingests long-range radio packets within a 2–10 km line-of-sight radius and forwards them via Ethernet, Wi-Fi, or Cellular backhaul to TTN.
- The Things Network (TTN): Handles Join Requests (OTAA), validates message integrity, and executes JavaScript payload formatters to convert raw binary bytes into JSON keys.
- MOSSS Integration Layer: Bridges TTN decoded payloads into local Home Assistant sensor entities via MQTT or native polling APIs.
🛠️ TTN Console Setup & Device Configuration
Step 1: Create Application & Register Gateway
- Log into your The Things Network (TTN) Console.
- Navigate to Gateways → Register Gateway and input your gateway’s EUI (found on the physical sticker or gateway interface).
- Select your region’s frequency plan (e.g.,
United States 902-928 MHz, FSB 2orEurope 863-870 MHz). - Navigate to Applications → Add Application and create a container (e.g.,
mosss-landslide-monitoring).
Step 2: Register Field Devices (OTAA)
We strongly recommend Over-The-Air Activation (OTAA) for secure key negotiation:
- Inside your TTN Application, click Devices → Register Device.
- Input device identification parameters:
- DevEUI: Unique 64-bit hardware ID burned into the node.
- AppEUI / JoinEUI: Application ID identifier.
- AppKey: 128-bit root key used to generate session keys.
Step 3: Configure Payload Formatter (Uplink Decoder)
LoRaWAN transmits raw byte arrays to minimize airtime. In the TTN Console under Payload Formatters → Uplink, add a JavaScript decoder to convert raw bytes to JSON before forwarding to Home Assistant. Pre-configured payload formatters in JS format are provided for each WOILD version in their respective software folders:
function decodeUplink(input) {
  var bytes = input.bytes;

  // Decode Battery Voltage (Bytes 0-1 as unsigned int, divided by 1000)
  var rawBattery = (bytes[0] << 8) | bytes[1];
  var batteryV = rawBattery / 1000.0;

  // Decode X-Axis Tilt Angle (Bytes 2-3 as signed int, divided by 10)
  var rawTiltX = (bytes[2] << 8) | bytes[3];
  if (rawTiltX & 0x8000) rawTiltX -= 0x10000; // Sign extend for negative values
  var tiltX = rawTiltX / 10.0;

  return {
    data: {
      battery_v: batteryV,
      tilt_x: tiltX
    }
  };
}
⚙️ Connecting TTN to Home Assistant
You can integrate TTN into your Home Assistant environment using either a direct local MQTT bridge or the native GUI-based storage integration. Instructions for adding individual sensing notes to TTN are covered later, in Chapter 5: WOILD Firmware.
Method 1: Local MQTT Broker Bridge (Recommended for Real-Time Pipelines)
Option A: Direct TTN MQTT Subscription
- In TTN Console, go to Integrations → MQTT.
- Note the Public TLS Address (e.g.,
nam1.cloud.thethings.network:8883) and generate an API Key with “Grant all rights” or “Read uplink traffic”. - Add a topic subscription in Home Assistant’s native MQTT integration for your TTN application path:
v3/{application_id}@ttn/devices/{device_id}/up
Option B: Mosquitto Broker Bridging (mosquitto.conf)
Add a broker-to-broker bridge definition in your local Mosquitto configuration to pull TTN messages into local channels automatically:
connection ttn-bridge
address nam1.cloud.thethings.network:8883
bridge_account_share false
remote_username mosss-landslide-monitoring@ttn
remote_password NNSXS.YOUR_GENERATED_TTN_API_KEY
bridge_cafile /etc/ssl/certs/ca-certificates.crt
topic v3/+/devices/+/up in 0 mosss/field/ ttn/
Method 2: Native Home Assistant TTN Storage Integration (GUI Setup)
The official Home Assistant The Things Network (TTN) integration pulls decoded sensor payloads directly from TTN’s Storage API using the native graphical interface without requiring custom broker bridge configurations.
Prerequisites in TTN Console
- Enable Storage Integration: In TTN Console under your Application, go to Integrations → Storage Integration and click Enable Storage Integration.
- Verify Uplink Formatter: Confirm Step 3 above is active so
decoded_payloaddictionary items are exposed. - Generate API Key: In TTN Console under API Keys, create a key with Read application traffic (uplink and downlink) permissions and copy the string (
NNSXS...).
Home Assistant GUI Configuration
- Navigate to Settings → Devices & Services → Add Integration.
- Search for The Things Network.
- Input your Application ID (
mosss-landslide-monitoring) and your API Key (NNSXS...), which can be generated in API keys within the left-hand menu of your application. Note: This API Key will not be saved or viewable after you set it up, copy and paste it to a secure notebook for access later. - Click Submit. Home Assistant will auto-create entities (e.g.,
sensor.woild_node_01_battery_v) under the TTN integration card once your nodes transmit them.
💡 Integration Method Comparison
| Feature | Local MQTT Bridge (Method 1) | Official Storage Integration (Method 2) |
|---|---|---|
| Setup Complexity | Moderate (Topic mapping / Config files) | Very Low (GUI Form) |
| Data Flow | Instant Push (Real-time MQTT stream) | Cloud Polling (TTN Storage API) |
| Network Dependency | Works across local LAN / private relays | Requires continuous public internet connectivity |
| Entity Creation | Defined via YAML or MQTT Discovery | Auto-created from decoded_payload |
| Best Used For | Low-latency local processing, off-grid gateways | Quick deployments, monitoring off-site TTN nodes |
⚠️ Crucial LoRaWAN Concepts for Beginners
1. The Fair Use Policy & Duty Cycles
- Airtime Limits: Public LoRaWAN networks like TTN strictly enforce a 30-second uplink airtime limit per day per device.
- Impact: Do not configure nodes to send telemetry every 5 seconds like Wi-Fi devices! Field nodes should transmit on interval thresholds (e.g., once every 15–60 minutes) or only when triggered by motion/tilt events.
2. Spreading Factor (SF) vs. Range
- Adaptive Data Rate (ADR): LoRaWAN dynamically adjusts data rates from SF7 (fast transmission, short range, low battery usage) to SF12 (slow transmission, extreme long range, high battery usage).
- Field Consideration: Nodes placed far down a steep canyon or deep under forest canopy will naturally shift to SF12, increasing airtime per packet significantly. Plan battery capacities accordingly.
👉 Proceed to Chapter 5: WOILD Firmware